Tired of typing your username and password every time you git push? Or perhaps dealing with credential helpers that occasionally hiccup? You're not alone. Welcome to the world of SSH keys – the unsung heroes of seamless and secure interaction between your local machine and remote Git platforms like GitHub, GitLab, and Bitbucket. Mastering Using SSH Keys for Git Platforms (GitHub, GitLab, Bitbucket) isn't just about convenience; it's about elevating your development workflow to a new standard of efficiency and cryptographic security.
Think of it as setting up a trusted handshake that happens automatically. Once configured, your Git commands fly, your commits sync effortlessly, and your focus remains squarely on building, not authenticating.
At a Glance: SSH Keys for Git Platforms
- What they are: A pair of cryptographic keys (public and private) for secure, password-less authentication.
- Why use them: Enhanced security, faster workflow, no repetitive password entry.
- How to generate: Use
ssh-keygen -t ed25519in your terminal. - Where to put them: Your public key goes on GitHub, GitLab, or Bitbucket; your private key stays securely on your computer.
- Testing: Verify your setup with
ssh -T git@github.com(or similar for other platforms). - Pro Tip: Manage multiple accounts/keys using an
~/.ssh/configfile.
The Secure Handshake: What Are SSH Keys and Why You Need Them
At its core, an SSH (Secure Shell) key pair consists of two distinct parts: a Public Key and a Private Key. This duo forms a robust cryptographic system that allows two parties (your computer and a Git hosting service) to authenticate each other without ever exchanging sensitive passwords.
Here’s the breakdown:
- The Private Key: This is your secret identity. It resides exclusively on your local machine, typically in a hidden
.sshdirectory within your user's home folder. It should never be shared, backed up insecurely, or exposed to anyone. Think of it as the physical key to your digital vault. - The Public Key: This is what you share with the world, or, more specifically, with your Git hosting platforms. It's safe to distribute because it can only be used to verify that someone possesses the corresponding private key, not to decrypt anything. It’s like a digital fingerprint that the server recognizes.
When you attempt to connect, say, to GitHub, your SSH client presents your public key. GitHub then encrypts a challenge with that public key and sends it back. Only your private key can decrypt this challenge, proving your identity without ever sending your private key or password over the network. This is the cryptographic magic that makes SSH so powerful and widely trusted.
The benefits for developers are immense: - Unparalleled Security: Significantly more secure than password-based authentication, especially against brute-force attacks.
- Seamless Workflow: Push, pull, and clone repositories without interruption. No more credential prompts!
- Automation-Friendly: Ideal for scripting automated deployments or CI/CD pipelines where human intervention isn't feasible.
Your First Secure Step: Generating an SSH Key Pair
Ready to ditch the password prompts? Generating an SSH key pair is straightforward. We'll use the ssh-keygen utility, which comes pre-installed on most Linux and macOS systems, and is available through Git Bash on Windows.
1. Open Your Terminal:
- Linux/macOS: Open Terminal.app or your preferred terminal emulator.
- Windows: Open Git Bash (you should have this if you installed Git).
2. Run the Generation Command:
The most recommended and secure algorithm for SSH keys today ised25519. It's fast and robust.
bash
ssh-keygen -t ed25519 -C "your_email@example.com"
Replace"your_email@example.com"with the email address associated with your Git platform account. This email isn't used for authentication; it simply serves as a helpful label for identifying the key later.
What ifed25519isn't supported?
While highly unlikely on modern systems, if you encounter an error, fall back to the RSA algorithm with a strong bit length:
bash
ssh-keygen -t rsa -b 4096 -C "your_email@example.com"
3. Follow the Prompts:
The command will ask you a few questions: - "Enter a file in which to save the key (~/.ssh/id_ed25519):"
- Press Enter to accept the default location. This is usually
~/.ssh/id_ed25519for the private key and~/.ssh/id_ed25519.pubfor the public key. Sticking to defaults makes management easier. - "Enter passphrase (empty for no passphrase):"
- Highly Recommended: Enter a strong passphrase here. This acts as an additional layer of security for your private key. Even if someone gains access to your private key file, they can't use it without the passphrase. You'll only need to enter this passphrase once per session (if using an SSH agent, more on that later). If you leave it empty, your key will be usable without any additional prompt, which is less secure but more convenient for some automated processes.
- Security Insight: A passphrase protects your private key even if your computer is compromised. Consider it your key's bodyguard.
- "Enter same passphrase again:"
- Re-enter your passphrase to confirm.
Once complete,ssh-keygenwill generate your key pair and display a confirmation message indicating where your public and private keys are saved. For a more detailed walkthrough on how to generate SSH keys with best practices, including common pitfalls and advanced options, check out our dedicated guide.
Sharing Your Digital Signature: Adding Your Public Key to Git Platforms
Now that you have your key pair, it's time to share your public key with your chosen Git hosting service. This is the crucial step where the platform learns to recognize your machine.
First, you need to copy the contents of your public key file.
Copying Your Public Key:
The public key is typically found in a file ending with .pub, for example, ~/.ssh/id_ed25519.pub.
- macOS:
bash
pbcopy < ~/.ssh/id_ed25519.pub
This command copies the content directly to your clipboard. - Windows (Git Bash):
bash
clip < ~/.ssh/id_ed25519.pub
Similar topbcopy, this puts the content onto your Windows clipboard. - Linux (or if the above don't work):
bash
cat ~/.ssh/id_ed25519.pub
This will print the public key to your terminal. Carefully select and copy the entire output, starting withssh-ed25519(orssh-rsa) and ending with your email address. Be careful not to miss any characters.
With your public key copied, navigate to your Git platform's settings:
Adding Your SSH Public Key to GitHub
- Log in to GitHub.
- Click on your profile avatar in the top-right corner.
- Select Settings.
- In the left sidebar, click SSH and GPG keys.
- Click the New SSH key or Add SSH key button.
- Give your key a descriptive Title (e.g., "My Work Laptop - October 2023"). This helps you identify keys later.
- Paste your copied public key into the Key field.
- Click Add SSH key. You may be prompted to confirm your GitHub password.
Adding Your SSH Public Key to GitLab
- Log in to GitLab.
- Click on your profile avatar in the top-right corner.
- Select Edit profile.
- In the left sidebar, click SSH Keys.
- Paste your copied public key into the Key field.
- Give your key a descriptive Title (e.g., "Home Desktop Key").
- Optionally, set an Expiration date for the key. This is a good security practice.
- Click Add key.
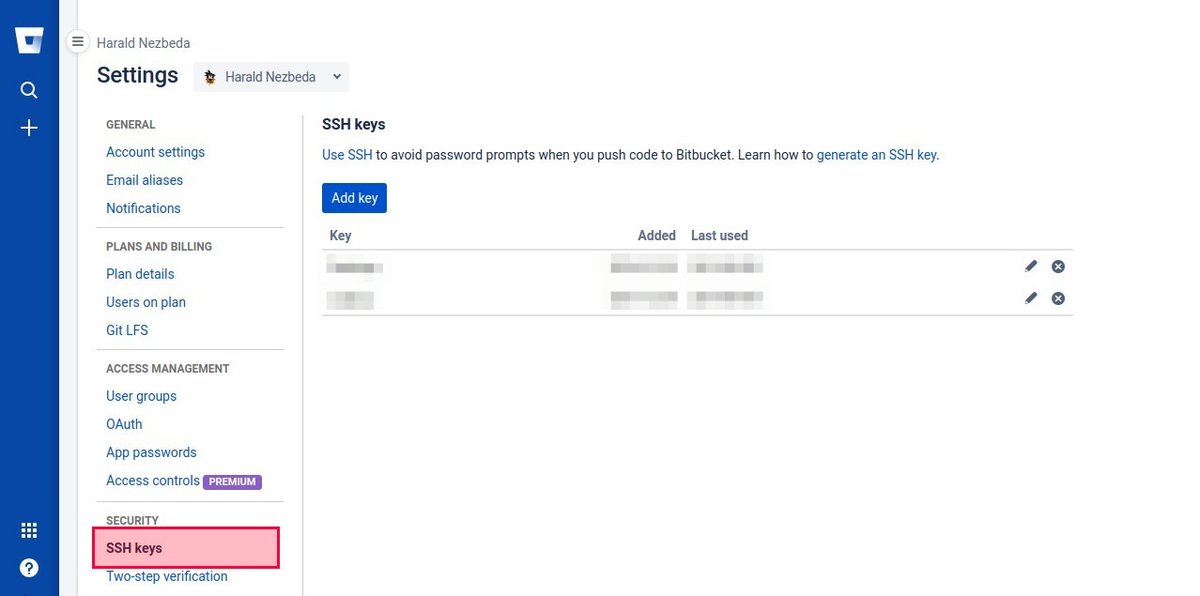
Adding Your SSH Public Key to Bitbucket
- Log in to Bitbucket.
- Click on your profile avatar in the top-right corner.
- Select Personal settings.
- In the left sidebar under "Security," click SSH keys.
- Click the Add key button.
- Give your key a descriptive Label (e.g., "MacBook Pro").
- Paste your copied public key into the Key field.
- Click Add key.
The Moment of Truth: Testing Your SSH Connection
After adding your public key to the platform, it's time to test if the secure handshake works. This step confirms that your SSH client can successfully communicate with the remote server using your new key.
Open your terminal or Git Bash again and run the appropriate command for your platform:
- GitHub:
bash
ssh -T git@github.com - GitLab:
bash
ssh -T git@gitlab.com - Bitbucket:
bash
ssh -T git@bitbucket.org
What to Expect: - First connection prompt: You might see a message like
"The authenticity of host 'github.com (IP_ADDRESS)' can't be established. Are you sure you want to continue connecting (yes/no/[fingerprint])?"This is normal. Typeyesand press Enter. This adds the host to yourknown_hostsfile, so you won't be asked again. - Passphrase prompt: If you secured your private key with a passphrase, you'll be prompted to enter it here.
- Success message: A successful connection will typically display a message similar to:
- GitHub:
"Hi YOUR_USERNAME! You've successfully authenticated, but GitHub does not provide shell access." - GitLab:
"Welcome to GitLab, @YOUR_USERNAME!" - Bitbucket:
"logged in as YOUR_USERNAME."or similar confirmation.
If you see a message like this, congratulations! Your SSH key setup is working. You can now use SSH URLs to clone and interact with repositories. For instance, to clone a GitHub repository, you'd usegit clone git@github.com:your-username/your-repo.gitinstead ofhttps://github.com/your-username/your-repo.git.
Troubleshooting Common Issues: Permission denied (publickey).:- Public key not added: Double-check that you've added the correct public key to your Git platform settings.
- Incorrect private key permissions: On Linux/macOS, your private key file (
id_ed25519) should have600permissions (-rw-------). You can fix this withchmod 600 ~/.ssh/id_ed25519. - SSH agent not running/key not added to agent: If you use a passphrase, your key might not be loaded into the SSH agent. Run
eval "$(ssh-agent -s)"(macOS/Linux) orstart-ssh-agent(Git Bash on Windows), thenssh-add ~/.ssh/id_ed25519. - Wrong key being used: This often happens when you have multiple keys. See the next section on managing multiple SSH keys.
Beyond the Basics: Managing Multiple SSH Keys for Different Accounts
Developers often work with multiple Git accounts – a personal GitHub account, a work GitLab account, perhaps another for open source contributions on Bitbucket. If you try to use a single SSH key for all of them, or have multiple default-named keys, you'll quickly run into permission issues or unexpected behavior.
The solution? Explicitly tell your SSH client which key to use for each connection. This involves generating uniquely named keys and configuring your ~/.ssh/config file.
The Problem: By default, your SSH client will try ~/.ssh/id_rsa or ~/.ssh/id_ed25519. If you have multiple accounts needing different keys, this default behavior leads to confusion and failed authentications.
The Solution: SSH Config File Magic
Here's how to manage multiple SSH keys seamlessly:
1. Generate SSH Keys for Each Account with Unique Names
Instead of accepting the default id_ed25519 filename, specify a new name using the -f flag. This creates distinct key pairs (e.g., id_ed25519_github_personal, id_ed25519_gitlab_work).
bash
For your personal GitHub account
ssh-keygen -t ed25519 -C "your_personal_email@example.com" -f ~/.ssh/id_ed25519_github_personal
For your work GitLab account
ssh-keygen -t ed25519 -C "your_work_email@example.com" -f ~/.ssh/id_ed25519_gitlab_work
Remember to use strong passphrases for each key!
2. Add Each Specific Public Key to Its Corresponding Git Hosting Platform
Copy each distinct public key and add it to the correct platform account as described in the previous section. For example:
- Copy
~/.ssh/id_ed25519_github_personal.puband add it to your personal GitHub account. - Copy
~/.ssh/id_ed25519_gitlab_work.puband add it to your work GitLab account.
3. Configure SSH to Use Different Keys with ~/.ssh/config
This is where the magic happens. You'll create (or edit) a file named config inside your ~/.ssh/ directory. If it doesn't exist, simply create it.
bash
touch ~/.ssh/config
Now, open ~/.ssh/config in your favorite text editor and add configurations for each custom host. Each Host block tells your SSH client to use a specific private key when connecting to a particular server alias.
config
Host github.com-personal
HostName github.com
User git
IdentityFile ~/.ssh/id_ed25519_github_personal
IdentitiesOnly yes # Recommended to ensure only this key is tried
Host gitlab.com-work
HostName gitlab.com
User git
IdentityFile ~/.ssh/id_ed25519_gitlab_work
IdentitiesOnly yes
Host bitbucket.org-oss
HostName bitbucket.org
User git
IdentityFile ~/.ssh/id_ed25519_bitbucket_oss
IdentitiesOnly yes
Explanation of parameters:
Host: This is a custom alias you define. When you use this alias (e.g.,github.com-personal) in your Git commands, SSH will look for this block.HostName: The actual domain name of the Git hosting service (e.g.,github.com,gitlab.com,bitbucket.org).User: Alwaysgitfor Git platforms using SSH.IdentityFile: The full path to the private key file associated with this account.IdentitiesOnly yes: This crucial setting prevents the SSH client from trying all your known keys, ensuring it only uses theIdentityFilespecified for that particularHostblock. This prevents connection failures due to too many authentication attempts.
4. Clone Repositories Using the Correct SSH Key
With your ~/.ssh/config in place, you now use your custom Host aliases when cloning repositories.
- For your personal GitHub repo:
bash
git clone git@github.com-personal:your_personal_username/your-repo.git - For your work GitLab repo:
bash
git clone git@gitlab.com-work:your_work_username/your-repo.git - For an open-source Bitbucket repo:
bash
git clone git@bitbucket.org-oss:your_oss_username/your-repo.git
Notice how theHostName(github.com,gitlab.com,bitbucket.org) is replaced by your customHostalias (github.com-personal,gitlab.com-work,bitbucket.org-oss).
5. Update an Existing Repository’s Remote
If you've already cloned a repository using an incorrect SSH key (or HTTPS), you can easily update its remote URL to use the correct configured alias. You'll need to know the original repository path (e.g., your_username/your-repo.git).
Navigate into your local repository directory, then run:
- For a GitHub personal repo:
bash
git remote set-url origin git@github.com-personal:your_personal_username/your-repo.git - For a GitLab work repo:
bash
git remote set-url origin git@gitlab.com-work:your_work_username/your-repo.git
You can verify the change withgit remote -v. This step is essential for seamless migration and ensures your existing projects leverage the new multi-key setup. For a deeper dive into how to manage your Git remotes effectively, including adding, removing, and inspecting remote URLs, check out our guide.
6. Test Your SSH Connection for Specific Accounts
To confirm everything is set up correctly, test each custom host alias:
bash
ssh -T git@github.com-personal # Should authenticate as your personal GitHub user
ssh -T git@gitlab.com-work # Should authenticate as your work GitLab user
Each command should return a success message identifying the correct user for that specific alias. This meticulous configuration prevents permission issues, streamlines your multi-account workflow, and ensures seamless interaction with all your Git repositories.
Fortifying Your Workflow: Essential SSH Key Best Practices
Setting up SSH keys is a fantastic start, but maintaining their security and efficiency requires adopting a few best practices. Think of these as the ongoing care for your secure digital handshake.
1. One Key Pair Per Device (Mostly)
While you can technically use the same private key on multiple devices, it's generally recommended to generate a new key pair for each device you use. If one device is compromised, you can revoke just that device's public key on your Git platforms without affecting access from your other machines. This minimizes your exposure.
2. Always Use a Strong Passphrase
We emphasized this during key generation, and it bears repeating: a strong passphrase for your private key is non-negotiable for robust security. It's your last line of defense. Without it, anyone who gains access to your private key file can impersonate you. This additional layer is paramount for strengthening your SSH key security with a passphrase.
3. Leverage the SSH Agent
Typing your passphrase every time you interact with Git can become tedious. The SSH agent is a program that runs in the background, holding your decrypted private keys in memory. Once you've added your key to the agent (and entered your passphrase), you won't be prompted again until the agent restarts or times out.
- To start the agent (if not running):
- Linux/macOS:
eval "$(ssh-agent -s)" - Windows (Git Bash):
start-ssh-agent - To add your key to the agent:
ssh-add ~/.ssh/id_ed25519(or the specific path to your named key)
Many desktop environments and Git clients automatically start and manage the SSH agent for you, reducing friction. For a more comprehensive look at this powerful tool, consider a deep dive into the SSH agent.
4. Rotate Keys Periodically
Just like passwords, SSH keys should be rotated (replaced with new ones) periodically, especially in high-security environments or if there's any suspicion of compromise. A common practice is annually or biannually. This involves:
- Generating a new SSH key pair.
- Adding the new public key to your Git platforms.
- Removing the old public key from your Git platforms.
- Updating your
~/.ssh/configfile if you used custom names.
5. Securely Backup Your Private Key
While you shouldn't share your private key, backing it up securely is a good idea. Encrypted USB drives, secure cloud storage with strong encryption, or dedicated password managers can be suitable options. Ensure the backup itself is protected by a strong password, separate from your key's passphrase.
6. Audit Your Keys on Git Platforms
Periodically check the "SSH and GPG keys" (or equivalent) section on GitHub, GitLab, and Bitbucket. Remove any old, unused, or unrecognized public keys. This helps maintain a clean security posture and reduces potential attack vectors. Regularly reviewing your access credentials is a part of essential developer security best practices.
Common Questions & Troubleshooting Your SSH Workflow
Even with a perfect setup, questions arise. Here are quick answers to some frequently asked questions and common troubleshooting scenarios.
Q: I keep getting "Permission denied (publickey)." What's wrong?
A: This is the most common issue.
- Did you add your public key? Ensure the correct public key is uploaded to your Git platform account.
- Is your key loaded in the SSH agent? If you use a passphrase, run
ssh-add(as mentioned above). - Are file permissions correct? Your private key (
~/.ssh/id_ed25519) should be600(chmod 600 ~/.ssh/id_ed25519). Your~/.sshdirectory should be700(chmod 700 ~/.ssh). - Are you using the right key for the right account? If you have multiple keys, check your
~/.ssh/configfile and thegit remote -voutput for the repo.
Q: My SSH connection times out or is very slow.
A: This could be a network issue. Check your internet connection. If you're behind a corporate firewall, you might need to configure your SSH client to use a proxy. This is done via your~/.ssh/configfile withProxyCommand.
Q: Are SSH keys really more secure than HTTPS for Git?
A: Generally, yes. While HTTPS with personal access tokens (PATs) is secure, SSH keys offer a cryptographically stronger authentication mechanism that relies on key pairs rather than tokens that can be misused if exposed. SSH also avoids the need for credential helpers, leading to a smoother experience.
Q: Can I use the same SSH key for GitHub and GitLab?
A: Yes, you absolutely can. If you only have one personal account across all platforms, you can use the same public key on GitHub, GitLab, and Bitbucket without any issues. However, if you plan to manage multiple accounts (e.g., personal and work on GitHub, or separate accounts on different platforms from the same machine), it's highly recommended to use distinct, named keys with the~/.ssh/configfile as outlined in the "Managing Multiple SSH Keys" section. This approach prevents conflicts and keeps your workflow clean and secure.
Your Next Secure Steps: Putting It All Together
You've now got the knowledge and the tools to implement a far more secure and efficient development workflow using SSH keys. From generating your first key pair to expertly managing multiple accounts across GitHub, GitLab, and Bitbucket, you're equipped to navigate the modern Git landscape with confidence.
Embrace the convenience of password-less authentication and the peace of mind that comes with robust cryptographic security. Start by generating your keys, adding them to your preferred platforms, and testing your connections. If you manage multiple profiles, take the extra step to configure your ~/.ssh/config for a truly seamless experience.
The days of cumbersome password prompts are over. Your secure, streamlined development journey begins now.