In today's interconnected digital landscape, securing remote access to servers is paramount. Whether you're a developer deploying code, a system administrator managing infrastructure, or simply accessing your personal cloud, SSH (Secure Shell) provides the cryptographic foundation for trustworthy and private communication. At the heart of this security lies public-key authentication, a method far more robust and convenient than traditional password-based logins.
This guide serves as your comprehensive hub to mastering the ssh generate key process. We'll demystify key concepts, walk you through step-by-step generation, and connect you to deeper dives on specific topics, ensuring you build secure, efficient remote connections.
The Foundation of Secure Access: Understanding SSH Keys
SSH operates on a client-server model, allowing you to securely execute commands on a remote machine. While password authentication is an option, it's generally discouraged due to its vulnerability to brute-force attacks and its cumbersome nature for automation. This is where SSH keys shine.
An SSH key pair consists of two distinct yet cryptographically linked components:
- The Private Key: This key remains exclusively on your local client machine. It's your digital identity, and like a physical house key, it must be kept secret and secure. Its permissions are typically set to
600(read/write only for the owner) to prevent unauthorized access. - The Public Key: This key can be freely shared and is placed on any remote server you wish to access securely. It typically resides in the
~/.ssh/authorized_keysfile on the remote machine.
When you attempt to connect, the remote server uses your public key to encrypt a challenge. Only your client, possessing the corresponding private key, can successfully decrypt this challenge and respond, thus proving your identity without ever transmitting your private key or a password over the network. This elegant handshake ensures a highly secure connection.
Preparing Your Environment and Checking for Existing Keys
Before we dive into creating new keys, it's wise to ensure your system is ready and to check if you already have existing SSH keys.
Prerequisites for Key Generation
To follow along, you'll generally need:
- A Linux or Unix-like system (e.g., Ubuntu, macOS, WSL on Windows) with an SSH client installed. Most modern distributions come with OpenSSH pre-installed.
- Access to a remote server where you intend to deploy your public key.
How to Check for Existing SSH Keys
It's common to already have an SSH key pair, especially if you've used services like Git or connected to cloud platforms before. Running ssh-keygen will, by default, suggest saving new keys in common locations (~/.ssh/id_rsa or ~/.ssh/id_ed25519). If you generate a new key with the same filename, it will overwrite the old one, so be cautious!
You can check for existing keys by listing files in your ~/.ssh directory:
bash
ls -l ~/.ssh/id_rsa.pub
ls -l ~/.ssh/id_ed25519.pub
If these commands return "No such file or directory," you don't have SSH keys in the default locations, and you're ready to generate new ones. If they exist, you can either use your current keys or proceed to create a fresh pair.
Generating Your First SSH Key Pair
The ssh-keygen utility is your primary tool for creating these crucial cryptographic pairs. It's a straightforward process that offers flexibility in key type and security settings. When you're ready to Generate Your SSH Key Pairs, this is where you'll begin.
Choosing Your Key Type for Optimal Security
Modern SSH implementations support various key algorithms, each with its own characteristics regarding security and performance. For most users, two types stand out:
- Ed25519 (Recommended): This is a modern, highly secure, and efficient elliptic-curve algorithm. It generates smaller keys that are faster to process while offering excellent security.
- RSA (Widely Compatible): RSA has been a long-standing standard. If you opt for RSA, always generate keys with a minimum length of 4096 bits for robust security.
We generally recommend Ed25519 for new key generations. To dive deeper into the strengths and weaknesses of different algorithms and best practices, explore our guide on SSH Key Algorithms & Security.
Step-by-Step Key Generation
Here are the commands to generate your key pair, depending on your chosen algorithm:
1. Generate an Ed25519 Key (Recommended):
bash
ssh-keygen -t ed25519 -C "your_email@example.com"
2. Generate an RSA Key (4096 bits):
bash
ssh-keygen -t rsa -b 4096 -C "your_email@example.com"
The -C flag allows you to add a comment to your public key, which is incredibly helpful for identification, especially when managing multiple keys or sharing them with teams. Your email address is a common and effective choice for this comment.
Navigating the Prompts
After executing the ssh-keygen command, you'll encounter a few prompts:
- "Enter file in which to save the key (~/.ssh/id_ed25519):"
- Press
Enterto accept the default location. This is usually~/.ssh/id_ed25519for Ed25519 keys or~/.ssh/id_rsafor RSA. You can specify a different path and filename if you wish to manage multiple distinct key pairs. - "Enter passphrase (empty for no passphrase):"
- Highly Recommended: Enter a strong, memorable passphrase here. This encrypts your private key on your local machine, adding an essential layer of security. Even if someone gains access to your private key file, they cannot use it without this passphrase.
- Note: If you set a passphrase, you'll be prompted for it every time you use the key, unless you utilize an SSH agent, which we'll discuss shortly.
- Press
Entertwice for no passphrase (not recommended for general use).
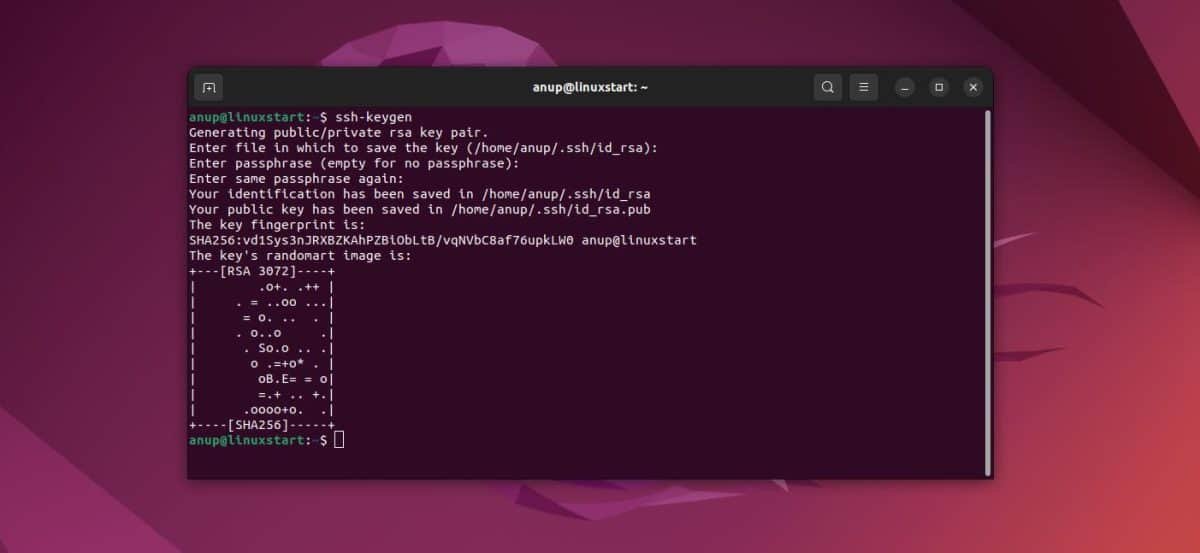
Upon successful generation,ssh-keygenwill display confirmation, including the key's fingerprint and an ASCII art representation. You'll now have two new files in your~/.sshdirectory: your private key (e.g.,id_ed25519) and your public key (e.g.,id_ed25519.pub). Remember, the private key must be kept secret!
Deploying Your Public Key to the Remote Server
Once your key pair is generated, the next crucial step is to get your public key onto the remote server you wish to access. This effectively "authorizes" your client to connect.
Method 1: Using ssh-copy-id (Recommended)
This utility is the easiest and most robust way to copy your public key. It handles creating the ~/.ssh directory on the remote server, setting correct permissions, and appending your public key to the authorized_keys file.
bash
ssh-copy-id user@remote_host
Replace user with your username on the remote server and remote_host with its IP address or hostname. You will be prompted for the remote user's password to establish the initial connection. After successful execution, your public key will be installed.
Method 2: Manual Public Key Copy
If ssh-copy-id isn't available or preferred, you can manually copy the key:
bash
cat ~/.ssh/id_ed25519.pub | ssh user@remote_host "mkdir -p ~/.ssh && chmod 700 ~/.ssh && cat >> ~/.ssh/authorized_keys && chmod 600 ~/.ssh/authorized_keys"
This command performs several actions: it reads your local public key, connects to the remote server using password authentication, ensures the ~/.ssh directory exists with correct permissions (700), appends your public key to authorized_keys, and sets the correct permissions for authorized_keys (600).
Testing Your SSH Key Authentication
With your public key deployed, it's time to test your secure connection.
bash
ssh user@remote_host
If everything is configured correctly:
- Without a passphrase: You should be logged into the remote server immediately without any password prompt.
- With a passphrase: You'll be prompted to enter the passphrase you set during key generation. Once entered, you'll gain access.
Congratulations! You've successfully established secure SSH key authentication.
Enhancing Convenience with the SSH Agent
If you opted for a passphrase, you might find typing it repeatedly tedious. The SSH agent is designed to solve this. It's a background program that securely stores your decrypted private keys in memory for the duration of your session, prompting you for your passphrase only once. This is a core aspect of Managing Your SSH Keys with greater efficiency.
Using the SSH Agent
- Start the SSH Agent (if not already running):
bash
eval "$(ssh-agent -s)"
This command starts the agent and sets the necessary environment variables. - Add Your Private Key to the Agent:
bash
ssh-add ~/.ssh/id_ed25519
You will be prompted for your passphrase here. Once entered, your key will be loaded into the agent. - List Keys in the Agent:
bash
ssh-add -l
This shows you which keys are currently loaded and ready for use.
Now, when you connect to a server using this key, you won't be prompted for the passphrase again until you restart your machine or the agent.
Managing Your SSH Keys and Advanced Configurations
As you work with more servers and possibly different key pairs, effective key management becomes vital.
Common Management Tasks
- View your public key:
cat ~/.ssh/id_ed25519.pub - List all key files in your SSH directory:
ls -l ~/.ssh/ - Remove a specific key from the agent:
ssh-add -d ~/.ssh/id_ed25519 - Remove all keys from the agent:
ssh-add -D - Delete a key pair permanently:
rm ~/.ssh/id_ed25519 ~/.ssh/id_ed25519.pub(Be extremely careful with this command!).
For more granular control, especially when using multiple keys or custom server configurations, the~/.ssh/configfile is incredibly powerful. This allows you to define aliases and specific settings for each host you connect to. Dive deeper into advanced configurations and agent management in our dedicated guide on Managing Your SSH Keys with.
Enhancing Server Security: Disabling Password Authentication
Once you've confirmed that SSH key authentication works flawlessly, a critical security step is to disable password authentication on your remote server. This eliminates the largest attack surface for remote access.
Important Warning: Before proceeding, ensure you can log in successfully with your SSH key. If you disable password authentication prematurely or incorrectly, you might lock yourself out of your server! It's wise to maintain a separate SSH session logged in during this process, or even a local console session if available, as a fallback.
- Connect to your remote server via SSH.
- Edit the SSH daemon configuration file:
bash
sudo nano /etc/ssh/sshd_config - Find and modify the following lines:
PasswordAuthentication no
ChallengeResponseAuthentication no
UsePAM no
(Ensure these lines are uncommented, i.e., remove the#at the beginning if present). - Save the file and exit the editor.
- Restart the SSH service to apply changes:
bash
sudo systemctl restart sshd
From now on, only users with a valid SSH key (and passphrase, if set) will be able to access your server, drastically improving its security posture.
Troubleshooting Common SSH Key Issues
Even with careful setup, issues can arise. Here are solutions to common problems:
- Permission Denied (publickey) error:
- Remote Server: Verify your public key is in
~/.ssh/authorized_keys. Ensure~/.sshhas700permissions (read, write, execute for owner only) andauthorized_keyshas600permissions (read/write for owner only). - Local Client: Ensure your private key file (
id_ed25519orid_rsa) has600permissions. Usechmod 600 ~/.ssh/id_ed25519. - SSH Agent Not Running error:
- You likely forgot to start the agent. Run
eval "$(ssh-agent -s)"and thenssh-addyour key. - Wrong Key Being Used:
- If you have multiple keys, SSH might try to use a different one. You can specify the key for a single connection:
ssh -i ~/.ssh/my_custom_key user@remote_host. - For permanent configurations, add an entry to your
~/.ssh/configfile:
Host myserver
HostName remote_host_ip_or_hostname
User user_on_remote
IdentityFile ~/.ssh/my_custom_key
Then, connect simply withssh myserver.
Beyond Basic Server Access: Other SSH Key Applications
While securing server access is the primary use case, SSH keys extend their utility to many other platforms and services.
Developers frequently leverage SSH keys for seamless and secure interactions with version control systems. If you're using platforms like GitHub, GitLab, or Bitbucket, understanding how to configure your SSH keys can greatly streamline your workflow. To learn more about setting this up, read our comprehensive guide on Learn about Git SSH Keys Use.
Cloud computing environments also heavily rely on SSH keys for instance access and management. Services like AWS EC2, Google Cloud Platform, and Microsoft Azure all integrate SSH public-key authentication as the recommended method for securing your virtual machines. For detailed instructions specific to these platforms, check out our resource on how to Set up cloud SSH keys.
Your Journey to Secure Connections Continues
Generating and managing SSH keys is a fundamental skill for anyone working in a networked environment. By embracing public-key authentication, you not only enhance your security posture but also simplify your workflow through passwordless access. As you continue to build and manage your digital infrastructure, the principles and practices outlined here will serve as a strong foundation, allowing you to connect confidently and securely to the world.